Concept Information
Understanding the Recently Run Reports List
Report Definitions Import/Export
Related Tasks
Accessing a Recently Run Report
Defining Report Style and Page Orientation
Defining Headings and the Footer in a Report
Grouping Numeric Fields into Ranges
Creating Comparisons with Denominators
Reference Materials
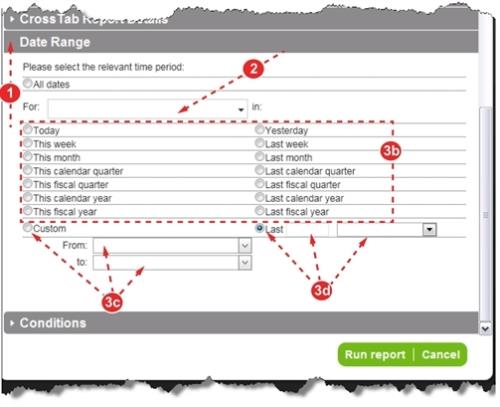
Selecting a Report's Date Range
The Date Range section allows users to filter the files available for the report by any Date field.
Prerequisites: You must have the 'Allow Access to Report
To select the report's date range:
- Open the Report Editor and expand the Date Range section.
- In the For field, select a date field.
- Note: For details on selecting fields, see Locating Fields.
- Select a date range or enter a custom date:
- All dates – does not include a date as a filter for the report.
- Note: If you selected a trend field from the Group by and Sub group by drop-down lists in Chart Details, the All dates radio button will not be available in Date Range, and the date field will be automatically populated with the same trend field.
- Dynamic Dates – a date that is relative to the day the report is generated. If you select This month, for example, the files available for the report reset at the beginning of the month. The user can generate a robust report at the end of May but will only see a handful of files when generating the report a few days later.
- Static Dates – select the Custom option to define a static date range with a specific From and To date, which is selected from a calendar.
- Custom Dynamic Date – dates that are relative to the day the report is generated. Enter a number and select a time period from the drop-down list. For example, this can be
Last 4 Months.