Concept Information
Related Tasks
Opening the Feedback File from Patient Experience
Removing a Question from a Survey
Viewing Survey Results in a Chart
Reference Materials
Sending a Response to Feedback
After reviewing a survey response, you may determine that a RL6:Feedback file should be created to capture a complaint, compliment, or grievance related to the survey response.
Prerequisites: You must have the 'Patient Experience' and 'File Entry' functions enabled for your role. For upgrading clients, forms must be modified to include the new Survey Response section (i.e. FBK_COMMON_SURVEYRESPONSEANSWERS) before sending survey responses to RL6:Feedback.
To send a response to RL6:Feedback:
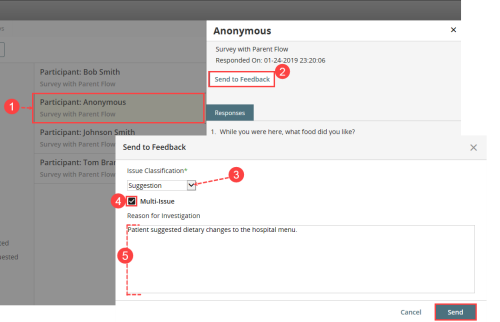
- In the Survey Responses tab, click on a survey response. The Review Response panel displays the full response details.
- Click the Send to Feedback button. In the Send to Feedback Details dialog is displayed.
- From the Issue Classification drop-down, choose an option (e.g. Suggestion).
- Go to the Multi-Issue check box and do one of the following: check the box in order to create a multi-issue Feedback file or clear the check box to create a single-issue Feedback file.
- Note: The Multi-Issue option is selected by default.
- In the Reason for Investigation field, enter a reason for the feedback.
- Click Send. A message is displayed to indicate that the new file was created successfully. The dialog closes and returns to the Review Response panel.
A Feedback file is created and the new Feedback File ID number, along with a date and time stamp of the submission, is displayed in the Review Response panel. To search for the new file, you can use the Search tool or go to File Info Center and search for the correct File ID. When you open the file, you will notice that the new Feedback file retains the respondent name (if names were provided in a follow-up section of the survey), date and time of submission, Feedback classification and reason for investigation.
Note: The date/time of submission is converted to the individual time zone of the user accessing the file.
For information on working on the new RL6:Feedback file, see:

