Creating an Export Package
You may export file data in one of three ways. Basic file interchange exports a list of files into the RL-XML![]() An XML format based on the taxonomy in an RL6 database. format or another format using an XSLT converter (which is placed in the FIM directory on the server). When
An XML format based on the taxonomy in an RL6 database. format or another format using an XSLT converter (which is placed in the FIM directory on the server). When
Prerequisites: You must have the 'File Interchange' function enabled for your role.
To create an export package:
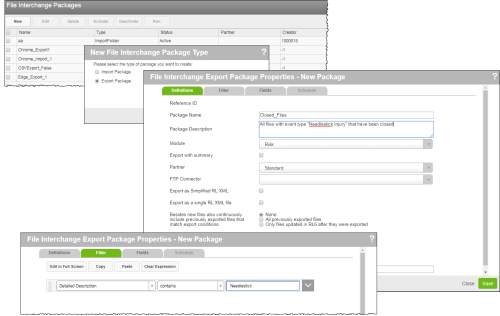
- Click New on the File Interchange Packages page (page 1).
- Select Export Package.
- Complete the Package Name field (i.e., RL_Export) and provide a Package Description, if desired.
- Choose the Module from which you are exporting data.
- Choose a Partner.
- Note: The default Standard partner exports files as individual RLXML files. Individual XMLExtensible Markup Language. A structured electronic file that allows you to exchange information between computer systems. and attachment files are compressed and batched together in a single ZIPThe file extension for a commonly used data compression and archive format. This type of file contains one or more files that have been bundled together for easy transport. Usually, compression algorithms are applied to the contents to reduce the overall file size. file. The remaining partners are module-specific (i.e., NDNQI is specific to Risk). If you select this option, you can also select Export with summary to include file summaries within the export files.
- Note: Ensure the Value field is completed for the partner on the File Interchange Partner Properties dialog to ensure a successful export. If blank, set the value to a path and folder name of your choosing (for example, C:\FileImport).
- Choose an FTP Connector, which determines the security of the connection and the server/subfolder location of the export output. See Creating an FTP Connector for more information.
- Note: For on-premise clients, if this field is kept blank, a Destination field will appear below (see step 12).
- Select Export as Simplified RL XML to keep the file size smaller.
- Select Export as a single RL XML file if you want all exported data within a single XML file.
- Select the default action for previously exported files that match export conditions:
- None - only export files newly introduced since the last export
- All previously exported files - include all files in the export package, including those that had been exported before
- Only files updated in RL6 after they were exported - in addition to new files, also include previously exported files that have been updated since last export
- (Only for on-premise clients, not shown) In the Destination field, type the folder name where the exported file will be placed; it will be created if it doesn’t already exist. Or, type an absolute path to a shared network directory (contact your network administrator for details).
- Click the Filter tab and use the Expression Editor to define what files should be exported (page 1).
- If desired, specify which fields should be exported when the package runs (page 1).
- If desired, add the FIM export job to a schedule (page 1).
- Click Save and Close to return to the File Interchange Packages page.
Note: To run the package, select it and click Run on the same page. You can then see the status of the package on the File Interchange Job Control page: see Managing File Interchange Jobs for more information.