Creating an FTP Connector
The FTP Configuration page enables admins to create file transfer protocol (FTP) connectors to associate with file interchange packages, and to configure settings such as the FTP type, server, security features, etc.
The FTP Configuration page is accessed via the FTP Configuration link under the Library section in the Admin Center.
Prerequisites: You must have the 'FTP Configuration' role function enabled.
To create an FTP connection:
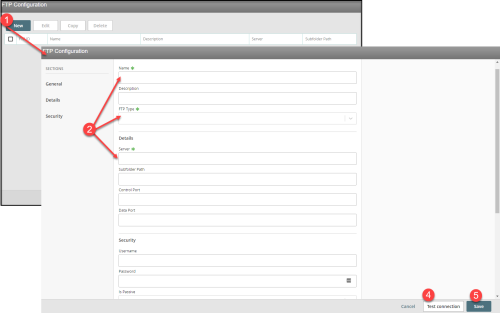
- On the main FTP Configuration page, click New.
- Complete, at minimum, the following required fields:
- Name - limited to 255 characters
- FTP Type - choose FTP, FTPS, or SFTP, depending on your security needs:
- FTP maintains transferred data in an unencrypted form.
- FTPS requires credentials, a certificate, or both in order to authenticate a user's connection.
- SFTP enables a combination of using SSH keys and/or credentials, adding a layer of security by encrypting both the credentials themselves and the data being transferred.
- Server - enter the server name or IP
 1. Internet Protocol 2. (For Infection) Infection Practitioner. An individual works to reduce the acquisition of healthcare-associated infections in patients, residents and staff at a healthcare organization. number.
- Complete any other fields in the General, Details, and Security sections, the following which will vary depending on your FTP type:
- Data Port - only applies to FTP and FTPS.
- Is Passive - only applies to FTP and FTPS. Default value is "True"; choose "False" if behind a firewall.
- Implicit Encryption - only applies to FTPS. Default value is "False".
- Private Key file - used to set up SFTP authentication only. If the field displays "None", it means no private key has been entered. After an RL6 update, the field shows "[unnamed file]" if there was a pre-configured private key before the update and existing FIM packages with SFTP settings are still intact. To enter a private key, click the Select file to upload button. From the file directory window, choose the file containing the private key and click Open. The file is added to the field.
- Note: Uploading a new private key will replace any existing private key. When a private key is being overwritten with a new one, a message prompts you to confirm this action. To remove a private key, click Remove.
- Passphrase - encrypts the private key; only applies to SFTP.
- Click Test Connection to test the newly configured FTP connection. If the test is successful, a Connection successful message displays. If there is an errors, a Cannot connect message displays.
- Click Save.
