Concept Information
Claims Section Interdependency
Related Tasks
Granting Users Access to a File
Managing a Mobile-Submitted File
Sending Data to Another Module
Checking User Access to a File
Reference Materials
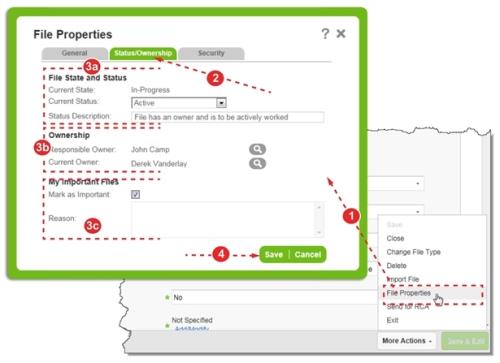
Modifying a File's Status or Ownership
You can add status details, define the file’s Responsible Owner![]() Typically a manager whose goal it is to make sure that the file gets closed. The Responsible Owner defaults to the user who created the file. and Current Owner
Typically a manager whose goal it is to make sure that the file gets closed. The Responsible Owner defaults to the user who created the file. and Current Owner![]() The user who is working on the file at this moment. They are taking the steps necessary to close the file. The Current Owner default to the person who created the file., and mark the files as “important” (which adds the file to your Views including Important files) on the Status/Ownership tab of the File Properties
The user who is working on the file at this moment. They are taking the steps necessary to close the file. The Current Owner default to the person who created the file., and mark the files as “important” (which adds the file to your Views including Important files) on the Status/Ownership tab of the File Properties
Tip: You can also change a file's status and/or ownership in the File Info
Prerequisites: You must have the 'File Properties', 'Change File Status', and 'Change File Ownership' functions enabled for your role.
To modify status/ownership for a file:
- Access the File Properties
- Click the Status/Ownership tab.
- Make modifications in the three sections:
- File State and Status – displays the Current State, which is automatically updated by RL6. Select the Current Status and modify the Status Description for files that are
In-Progress,ClosedorDeleted. - Ownership – click the magnifying glass icon to search for the user who should be the Responsible Owner or Current Owner.
- Note: The Current Owner and Responsible Owner fields default to the user who created the file. They can be changed to help differentiate between the files that members of the same department are working on. However, file ownership cannot be reassigned to frontline staff.
- My Important FilesThe electronic record created when a user submits an incident report, such as a fall or medication error, or when a patient provides feedback. Some organizations refer to files as events, reports, or cases. – check the Mark as Important box and type a Reason to include the file in your Views on the File Info
- File State and Status – displays the Current State, which is automatically updated by RL6. Select the Current Status and modify the Status Description for files that are
- Click Save to return to the file.