Concept Information
Related Tasks
Creating, Editing or Copying a User
Enabling Users to Act As the Current User
Adding or Removing a User from a Schedule
Assigning External Authentication
Removing External Authentication
Reference Materials
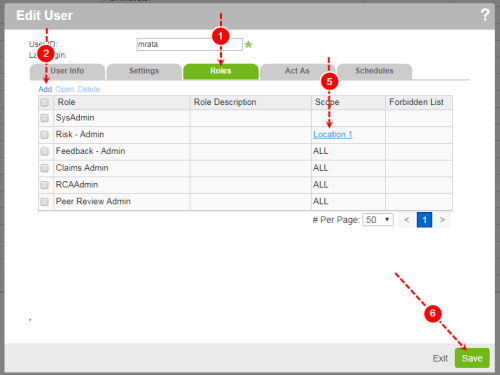
Editing a User's Role Assignments
The Roles tab is used to define the type of access the user has in RL6. This is done through a variety of settings that start at the broadest level (modules) and works down to the finest level of control
To create or edit a user's role assignments, do the following on the Roles tab:
- Access the User
- If adding a new role assignment, click the Add link. Or if editing an existing one, select the role assignment and click Open. The User RoleAn attribute assigned to your user profile that determines the pages and functionality to which you have access in RL6. Info
- Select values from the following fields on the User Role Info
- Module – one of the modules your
Basic Administration, Administration,File ManagementorData Entry.- Note: The Module and
- Role – see Roles for details.
- ScopeThe files to which you have access. –
Infection ALLfrom the list. - Forbidden Fields –
- Module – one of the modules your
- Click OK on the User Role Info
- If you need to verify or edit the user's scope, click the link in the Scope column to go to the Scope Details
- Note: Only condition-based scopes will appear as links in the Scopes column.
- Caution! If you edit the scope, the updates will affect other users who are also assigned to that scope.
- Click Save or access another tab: