Forbidden Fields
To configure forbidden fields:
- Click the Logged in as menu and click Admin
- Under the Security heading, click the Forbidden Fields link (not shown).
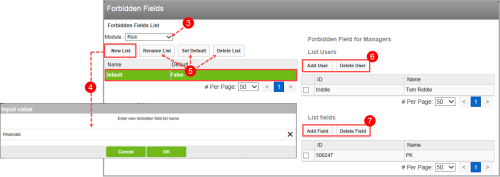
The Forbidden Fields page appears. - Select a Module from the list.
- Click New List to create a new forbidden fields list. The Input Value
- Type a name for the list.
- Click OK. A new row is added to the list.
- Click the name of the list with which you would like to work. The users to whom the list is assigned and the fields it contains are shown. You may also click:
- Rename List – to change the name.
- Set Default – to set the Default flag to
True. - Delete List – to delete the list.
- If necessary, click Add User to select a user to whom the list should be assigned. You can also click Delete User to remove a user from the list.
- Use the Add Field (Locating Fields) and Delete Field buttons to work with the contents of the forbidden fields list.