Concept Information
Related Tasks
Adding an Attachment to a Form
Adding a Contributing Policy Section to a Form
Reference Materials
Configuring a Form
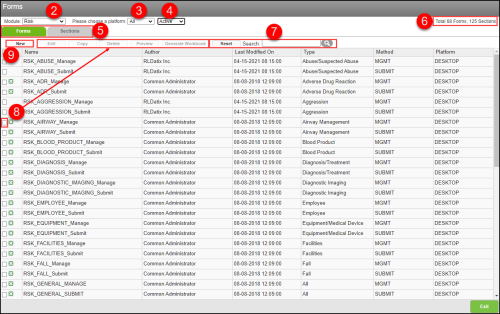
![]() A number of fields grouped together by sections to allow users to enter and store data related to a patient or employee event. You can define multiple forms for a module. Forms fall into two categories: submission forms (i.e. for front line entry users) and management forms (i.e. for file manager users). Management forms contain the same data as submission forms with added sections for follow-up investigations and resolutions and outcomes. page is divided into two areas: Forms (shown below) and Sections. The form acts as a container for section templates, which are where the real nuts and bolts of form design happens. Access to this page is determined by the roles assigned to your user profile.
A number of fields grouped together by sections to allow users to enter and store data related to a patient or employee event. You can define multiple forms for a module. Forms fall into two categories: submission forms (i.e. for front line entry users) and management forms (i.e. for file manager users). Management forms contain the same data as submission forms with added sections for follow-up investigations and resolutions and outcomes. page is divided into two areas: Forms (shown below) and Sections. The form acts as a container for section templates, which are where the real nuts and bolts of form design happens. Access to this page is determined by the roles assigned to your user profile.
Note: For information about RL6:RootCause and RL6:PeerReview forms, see also RCA and Peer Review Forms.
Prerequisites: The 'Forms', 'Create Forms','Edit Forms' and 'Delete Forms' role functions must be enabled.
To configure a form:
- Click the Logged in as menu and click Admin
- Select a Module.
- Select a Platform.
- Select whether you want to view All, Active, or Archived forms.
- If desired, toggle between the Forms (shown here) and Sections views. See Creating a Section Template for more information.
- A count of forms and section templates appears in the upper-right corner.
- If necessary, filter the list of forms; type the form name into the search field and press Enter or click the magnifying glass icon. To remove the search filter, click Reset.
- Check a box next to an existing form to activate the action buttons (See Form Designer Action Buttons).
- Click New to create a new form (See Navigating the Form Designer).