Modifying Recipients in a Schedule
You can modify settings for individual, role or user group based recipients for a selected schedule.
Prerequisites: The 'Schedules', 'Create Schedules' and 'Edit Schedules' role functions must be enabled.
- Go to the Recipients tab of the Schedule
- If the recipient was assigned to the schedule as:
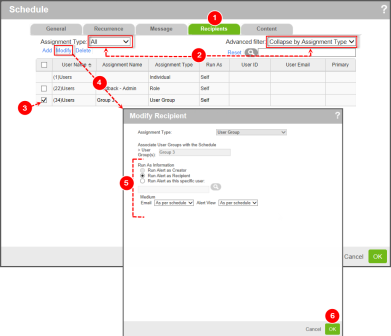
- Individual - from the Assignment Type drop-down, choose All or Individual and then from the Advanced filter drop-down, choose All or Show Primary Only.
- Roles - from the Assignment Type drop-down, choose All or RoleAn attribute assigned to your user profile that determines the pages and functionality to which you have access in RL6. and from the Advanced filter drop-down, chooseCollapse by Assignment Type
- User Groups - choose All or User Groups from the Assignment Type filter and Collapse by Assignment Type from the Advanced filter.
- From the grid list, choose the recipient (individual, role, or user group).
- Note: If there is no check box next to the recipient you want to select, it means that you cannot modify or delete it in the current display. See the previous step to set the correct display.
- Click Modify. The Modify Recipient
- Edit the parameter settings (e.g., Run As Information).
- Note: You cannot change the Assignment Type or the associated individual, role or group. If you want to make these types of changes, you must delete the recipient and add a new one. See Deleting Recipients in a Schedule
- Click OK. The
Note: Changes you make to role or user group-based assignments may also change the "primary" status for some recipients. After you have modified a recipient, check the grid list to see the status under the Primary column. Individual assignments will always retain "primary" status.