Configuring Email Messages for Schedules
The Message![]() The test results are received via a message from the client integration engine to the RL integration engine. Each message may contain one or more test results; these test results only pertain to a single order. tab is used to configure the format, from address, subject and body of the email message sent to users listed on the Recipients tab. You can insert variables into the message body to
The test results are received via a message from the client integration engine to the RL integration engine. Each message may contain one or more test results; these test results only pertain to a single order. tab is used to configure the format, from address, subject and body of the email message sent to users listed on the Recipients tab. You can insert variables into the message body to
Prerequisites: The 'Schedules', 'Create Schedules' and 'Edit Schedules' role functions must be enabled.
Note: Emails are only sent when data is found for the associated reports, file interchange jobs or alerts. When an alert finds information to communicate, the alert message is appended to the schedule message.
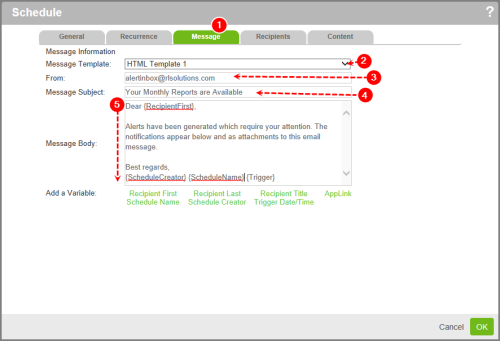
Understanding the Message Tab
- Open the Schedule
- Choose a Message Template. The message body is placed into the designated place in the email message.
- Warning: Selecting
Plain Textsends the message with no formatting, converting link variables into text. - Enter the From email address. You should enter an address that would not be filtered into the recipient’s junk mail folder.
- Enter the Message Subject (100 char.).
- Enter the Message Body (1000 char.).
- Tip: Customize the message by placing your cursor in the message body field and clicking the variable links below.
- See other Schedule