Assigning Recipients in Schedules
The Recipients tab is used to determine who receives the schedule’s associated reports, file interchange job summaries or alert notifications. Both Alerts![]() A warning that is sent out in the form of an email and/or an in-system alert notification under defined circumstances (e.g. an abnormally high number of complaints or incidents are reported, a high severity incident occurs, or when a file is ignored for a given period of time). Alerts are created by your administrator and are triggered at defined intervals (e.g. daily, weekly, monthly). and Reports can be sent to anyone with an email address. Alert recipients must be RL6 Users to be able to follow any file links.
A warning that is sent out in the form of an email and/or an in-system alert notification under defined circumstances (e.g. an abnormally high number of complaints or incidents are reported, a high severity incident occurs, or when a file is ignored for a given period of time). Alerts are created by your administrator and are triggered at defined intervals (e.g. daily, weekly, monthly). and Reports can be sent to anyone with an email address. Alert recipients must be RL6 Users to be able to follow any file links.
When users are made Inactive, they will no longer receive notifications. When users become Active again, they will not receive notifications for files that were create while they did not have access to the system.
Prerequisites: The 'Schedules', 'Create Schedules', 'Edit Schedules' and 'Make Schedules Active/ inactive' role functions must be enabled.
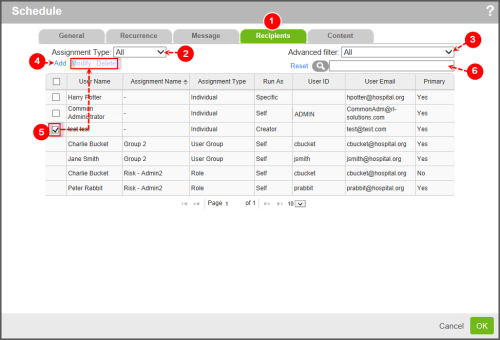
To use the Recipients tab:
- Open the Schedule
- From the Assignment Type field, choose one of the filter options:
- Individual - displays individual users assigned to schedule only
- RoleAn attribute assigned to your user profile that determines the pages and functionality to which you have access in RL6. - displays role-based users assigned to schedule
- User Group - displays group-based users assigned to the schedule.
- All - displays all user recipients based on individual, role-based, or user group based assignment. This is the default option.
- From the Advanced Filter drop-down, choose one of the following:
- All - displays all assignment types
Note: In the example below, the grid displays one row per recipient assigned. However, you may notice that a recipient may be listed more than once. A user may be assigned to a schedule through different assignments (e.g. individual, roles and user groups). Where there are multiple assignments for a recipient, there may be conflicts between the definitions that determine the method of execution (i.e. run as). To avoid conflicts, the system will designate a "primary" status to one assignment to indicate which schedule setting to use. Primary status is given to assignments based on a hierarchy of Assignment Types. Roles is considered the base and is overridden by User Group then finally by Individual assignments. - Collapse by Assignment Type - shows a single row for each combination of assignment type, assignment name and Run As added rather than one row per user. In this view, the User Name column shows the total number of users for the unique row.
- Show Primary - displays only the primary assignment for a user in the event that a user is assigned to the schedule through a variety of methods (e.g. individual, role, user group) and the parameters (e.g. run as) conflict. This option is selected by default.
- All - displays all assignment types
- Click theAdd link to select a recipient for the schedule notification (page 1).
- Once recipients have been added to the schedule, select a recipient to activate these links:
- To quickly search for a user, go to the search field and enter a portion of the user name, assignment name, assignment type, Run as type, user ID, or user email. Then, click the Search icon. The system displays all recipients matching your entry.
See other Schedule
- Defining General Properties for Schedules
- Setting Schedule Recurrence
- Configuring Email Messages for Schedules
- Defining the Content in Schedules