Adding Recipients to a Schedule
The Add Recipients
Prerequisites: The 'Schedules', 'Create Schedules' and 'Edit Schedules' role functions must be enabled.
To add recipients to a schedule:
- From the Recipients tab of the Schedule
- From the Assignment Type drop-down list, choose one of the following options:
- Individual - to add one or several users as direct subscribers to the Schedule. Here you will be able to search for a specific RL6 user, enter in external user details or add a static batch of users with a RoleAn attribute assigned to your user profile that determines the pages and functionality to which you have access in RL6. filter
- Role - to dynamically associate one or more Roles to the schedule
- User Group - to dynamically associate one or more User Groups to the schedule
- Individual - to add one or several users as direct subscribers to the Schedule. Here you will be able to search for a specific RL6 user, enter in external user details or add a static batch of users with a Role
- Choose the specific recipient(s). Options vary depending on the Assignment Type selected. See Assignment Type options
- Select a Run As Information setting to choose the scope of files used when the report, file interchange job or alert is run:
- Run as Creator – the user who created the schedule.
- Run as Recipient – the user selected in the Add a User as Recipient area.
- Run as this specific user – click the magnifying glass to choose a user (page 1).
- (For AlertsA warning that is sent out in the form of an email and/or an in-system alert notification under defined circumstances (e.g. an abnormally high number of complaints or incidents are reported, a high severity incident occurs, or when a file is ignored for a given period of time). Alerts are created by your administrator and are triggered at defined intervals (e.g. daily, weekly, monthly). only) Select settings for Email and Alert View mediums:
- As per schedule - uses the schedule medium defined in the Content tab
- Yes - indicates to the system that this medium should be used, overriding the schedule medium
- No -- indicates to the system that this medium should not be used, overriding the schedule medium.
- Click OK. In the Recipients grid list, a row is added for each individual and for each member of a user group or role assigned and all recipients will now receive the schedule notifications.
For more information, see also:

|
Assignment Type |
Image |
Description |
|---|---|---|
|
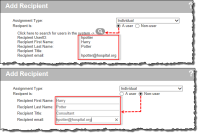
Individual |
Selecting an RL6 user or external recipient:
|
When you choose Individual from the Assignment Type drop-down, choose an option:
|
|
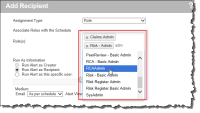
Role |
|
When you choose Role from the Assignment Type drop-down, the Associate Roles with the Schedule field appears. In this field:
When a user is assigned to or unassigned from a role, they will be also be automatically added to or removed from the schedule accordingly. |
|
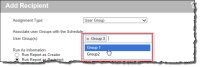
User Group |
|
When you choose User Group from the Assignment Type drop-down list, the Associate User Groups with the Schedule field appears. In this field:
As Users are assigned or unassigned to the associated User Group(s), they will join or be removed from the schedules accordingly. |