
Concept Information
Patient Data Import into Peer Review
Related Tasks
Managing a Submitted Peer Review File
Adding Patients Involved to a Peer Review File
Adding a Reviewer or Provider to a Peer Review File
Sending a Notification to a Provider
Creating Actions for a Provider
Adding an Event to the Timeline in Peer Review
Editing or Deleting a Timeline Event
Sending Notification to a Reviewer
Viewing, Editing, and Resending a Request
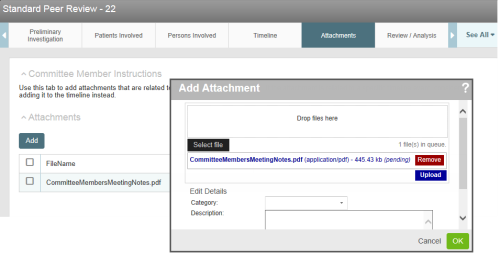
Adding Attachments
In addition to attaching files to specific timeline events in the Timeline tab, you can also attach files which are relevant to the general investigation.
Prerequisites: You must have the 'View File', 'Edit File', and 'Add File Attachments' enabled for your role.
To add an attachment:
- Open the file and go to the Attachments tab.
- Click Add. The Add Attachment
- (Optional) Click on the Edit Details link and choose Category and enter a Description.
- Click Select File and locate the file(s) from your computer or network.
- When you have selected the file(s), click Upload.
- Click OK. The attachment is added to the file in the Attachments grid.
To open, modify or remove an attachment:
- Open the file and go to the Attachments tab.
- In the Attachments section, select the file.
- Note: When you select an attached file, new buttons appear above the grid.
- Choose one of the options:
- Open - to open and view the file.
- Modify - to modify the Description for the file attachment.
- Remove - to remove the attachment from the file. A confirmation