Related Tasks
Reference Materials
Navigating the Icon Wall
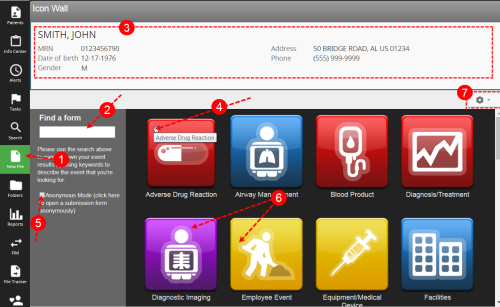
The Icon Wall contains links to the submission forms used to create new files. An administrator configures the arrangement of the icons on this page and the forms they access. The administrator can also decide to bypass the Icon Wall if the user has access to only one form. This page must be used in order to create a new file.
Prerequisites: You must have the 'File Entry' function enabled for your role.
To navigate the icon wall:
- Click the New File navigation button to access the Icon Wall. (Alternatively, the Icon Wall can be accessed by clicking New File in patient search results, Viewing Patient Center Search Results).
- If necessary, use the Search field to find a specific form.
FormsA number of fields grouped together by sections to allow users to enter and store data related to a patient or employee event. You can define multiple forms for a module. Forms fall into two categories: submission forms (i.e. for front line entry users) and management forms (i.e. for file manager users). Management forms contain the same data as submission forms with added sections for follow-up investigations and resolutions and outcomes. that include the text in the form name, keywords or in a section title will appear in the results. - If the Icon Wall was accessed through Patient
- Hover over an icon to view a description of the form in a tool-tip.
- Check Anonymous Mode box (not shown) to submit a file anonymously.
- Click an icon to open the associated submission form.
- Click the Settings button and choose to hide or display icon titles.
- Note: See the section Form Attributes for details on completing the form.