Concept Information
Related Tasks
Reference Materials
Adding an Icon
BMP, JPG, ![]() An image file format generally used for photographic images.
An image file format generally used for photographic images.PNG or GIF, can be used to create an icon. RL6 will resize the graphic so that the height and width are consistent with other icons on the wall. The best images to use have the same height and width (i.e., a square); when one side is longer than the other, the longest side is resized to the standard 250 pixels dimension, meaning the shorter side will be less than 250 pixels.
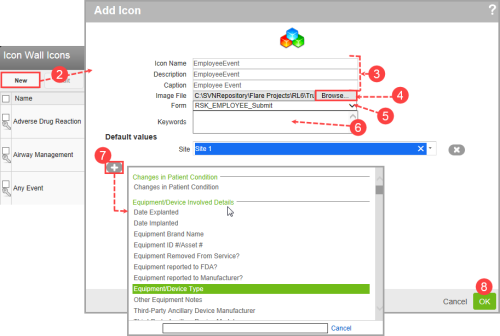
To add an icon to the Icon Wall:
- Access the Icon Wall Icons page (not shown, see Updating Icon Wall Icons).
- Click the New button.
- Complete the Icon Name, Description, and Caption fields (Icon Field Descriptions).
- Click Choose File:
- Locate and select the image to use as the icon on your computer or network.
- Click Open. The file path to the image is displayed in the Upload Image field.
- Select the Form to which the graphic should be associated.
- Enter the keywords you want to use to help identify the form in searches. For example, if you enter ‘Brown’ as a keyword, this form appears when ‘Brown’ is in the search field of the Icon Wall.
- Set any default values.
- Click the plus icon and select a field.
- Enter or select the default value for the field.
- Click the X icon to delete the field default value.
Note: When you have created a new form for RL6:PeerReview, select the File type field and then choose the correct file type option for the selected form.
- Click OK. The new icon is created with the graphic resized to 250 by 250 pixels.