
Viewing and Editing CSV Import Service Settings
Note: You must have the "Services Configuration" role permission in order to access this page.
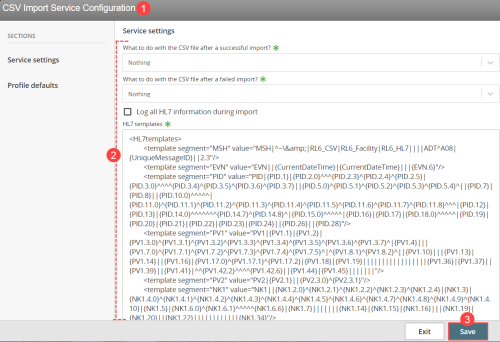
To view or edit settings for the CSV![]() A Comma Separated Values file. Each row in the file represents a record. When opened in Microsoft Excel®, each value appears in its own cell; when opened in Notepad®, however, the record’s values are separated by commas. Import Service:
A Comma Separated Values file. Each row in the file represents a record. When opened in Microsoft Excel®, each value appears in its own cell; when opened in Notepad®, however, the record’s values are separated by commas. Import Service:
- In the Admin Center page, go to the System Configuration section and click the CSV Import Service Configuration link. The CSV Import Service Configuration page displays service settings and profile defaults.
- In the main page, change the CSV Import service settings (see as necessary:
- Service Settings - to define what happens with the CSV file after failed or successful import, what is logged during the import process and the HL7Health Level-7 is an international set of open standards used to format data and content, allowing different health information systems to easily and effectively communicate with one another. template.
- Profile defaults - to define the default settings for CSV Import profiles. When a new profile is created, the default values will be automatically populated in the fields and can be modified as necessary.
Note: In order to save configuration changes, mandatory fields must not be empty. If you attempt to navigate away from the page without saving, a confirmation message will prompt you to leave and discard your changes or return to the page to allow you to save.
- Service Settings - to define what happens with the CSV file after failed or successful import, what is logged during the import process and the HL7
- Click Save. The changes are saved to the RL6 database if all changes pass the validation checks.
When a parameter is updated through the CSV Import Service Configuration page, the service uses the new values the next time it executes.
Note: Each parameter change has its own log entry in the System Audit Log under event: CSV import service configuration updated.
|
Section |
Setting |
Description |
|
Service Settings |
What to do with the CSV file after a successful import? |
Choose one of the following options:
|
|
What to do with the CSV file after a failed import? |
Choose one of the following options:
|
|
|
Log all HL7 information during import |
Check this box to save detailed information (i.e. including PHI data) into the HL7 import log during CSV file import. If unchecked, no PHI data will be included and only the Header and Identifier will be saved in the log. Note: This option affects CSV imports for HL7 only. |
|
|
HL7 templates |
The CSV Import service converts patient data into HL7 messages and sends them to HL7 Listener service for processing. This field contains the default HL7 message template used for CSV imports containing patient data. Note: Modifications to the HL7 template may cause errors which prevent the HL7 Listener from processing the message. |
|
|
Profile Defaults
|
FTP Connector |
If FTP connectors have been defined, choose an option from the drop-down menu to import files from an FTP location.. See Creating an FTP Connector for more information. Note: Alternatively, if a UNC operation is enabled in the system, you can use the Import folder path field to import files from an application server folder. |
|
Import folder path |
If a UNC operation is enabled, use this field to enter the application server folder name and path from which the CSV files are imported. The system looks for files in this location that conform to a predefined naming convention that includes a prefix, date format, optional postfix and extension (e.g. DATA20190130.csv). Note: This field is only displayed if a UNC operation is enabled in the system. For more information, contact RLDatix support. |
|
|
File name prefix |
Import files must begin with a prefix defined here. By default, the prefix is set to "DATA" but this can be changed to your preference or the type of profile. |
|
|
File name postfix |
Like a prefix, you can also append characters to a file name (i.e. following the date and before the extension) for import files. This field is optional. |
|
|
File date format |
Import files must include the date in the file name in the format defined here. By default, this is set to "YYYYMMDD". Note: The system will recognize only standard date format strings. |
|
|
Time Zone |
This option allows you to select a time zone for the CSV import schedule. By default, the application time zone is selected. |
|
|
File name extension |
Import files must be in the file format defined here. By default, this is "CSV". |
|
|
The first row of the file is a column header |
Check this box to indicate that the first row in the import file is a column header. Unchecked, the first row in the import file will be treated as a data record. |
|
|
Field delimiter |
The character delimiter used to separate values. By default, commas (,) are used. |
|
|
Field quote |
The character used for field quotes. By default, the quotation character (") is used. Note: Quotation marks are not allowed in strings that are delimited by quotation marks. |
|
|
Abort import after # of errors (0 - no limit) |
Enter the allowable number of errors to occur during an import before aborting the process. The value entered must be an integer. The default value is 0. |
|
|
Enable schedule |
Check this box to set up an automated schedule. Then, go to the Run every # days and define the frequency. Note: If you do not enable the CSV Import Service to run on an automated schedule, you can run it manually. See Running the CSV Import Manually. |
|
|
Run every # days |
If Enable schedule is checked, enter a number to determine the frequency (i.e. number of days) at which the import service will run. Note: The value cannot be null or zero and must be a whole number. |
|
|
The IP address where the RL6 HL7 Listener service resides. |
||
|
Port |
The port number on which RL6 HL7 Listeners service receives data. |
|
|
HL7 datetime format |
This field contains the default HL7 datetime format (i.e., yyyyMMddHHmmss) when a new Patient/HL7 CSV Import profile is created. |
|
|
HL7 mapping |
This field contains the default HL7 mappings when a new Patient/HL7 CSV Import profile is created. |