Mapping CSV Import Fields
For all import types except for Patient, this Mapping section of the CSV![]() A Comma Separated Values file. Each row in the file represents a record. When opened in Microsoft Excel®, each value appears in its own cell; when opened in Notepad®, however, the record’s values are separated by commas. Import Profile page allows you to define the mapping between database table fields and the import file columns.
A Comma Separated Values file. Each row in the file represents a record. When opened in Microsoft Excel®, each value appears in its own cell; when opened in Notepad®, however, the record’s values are separated by commas. Import Profile page allows you to define the mapping between database table fields and the import file columns.
Note: You must select an Import Type and fill in additional mandatory fields in the CSV Import Profile page before you can define the mapping. For more information, see Creating a CSV Import Service Profile.
To define the mapping for a CSV Import Profile:
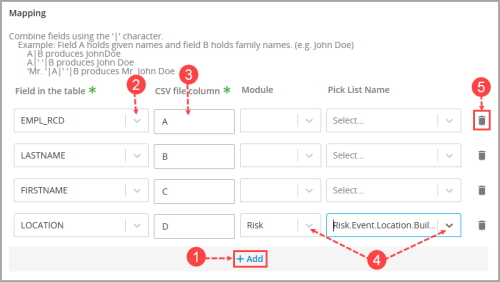
- In the Mapping section of the CSV Import Profile page, click +Add. A new row is displayed.
- From the Field in the Table drop-down, choose the field.
- From the CSV file column drop-down, enter the column header (e.g. A, B, C) in the CSV file to be mapped to the selected field.
- (Optional) To add the value to a pick list, choose a Module and then choose a Pick List Name.
- Note: Mapping a value to a pick list is typically used for location fields. This step is optional.
- (Optional) If you make an error and need to remove a mapping, click on the trash can icon to the left of the row. The row will be deleted.
- Click +Add to map another field to column and repeat as necessary.
Once you are finished, click Save.