Modifying Alert Properties
The General tab is shown when the Alert Properties
Prerequisite: You must have the 'Admin - Alerts![]() A warning that is sent out in the form of an email and/or an in-system alert notification under defined circumstances (e.g. an abnormally high number of complaints or incidents are reported, a high severity incident occurs, or when a file is ignored for a given period of time). Alerts are created by your administrator and are triggered at defined intervals (e.g. daily, weekly, monthly).' and 'Create Alerts' or 'Edit Alerts' functions enabled for your role.
A warning that is sent out in the form of an email and/or an in-system alert notification under defined circumstances (e.g. an abnormally high number of complaints or incidents are reported, a high severity incident occurs, or when a file is ignored for a given period of time). Alerts are created by your administrator and are triggered at defined intervals (e.g. daily, weekly, monthly).' and 'Create Alerts' or 'Edit Alerts' functions enabled for your role.
To modify alert properties:
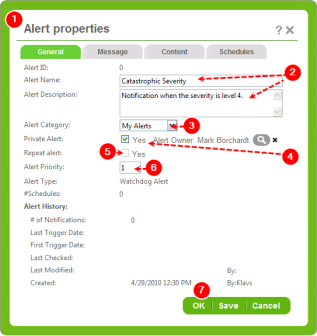
- Open the Alert Properties
- Enter up to 50 characters for the Alert Name and up to 255 characters for the Alert Description.
- Choose an Alert Category
- (Optional) If the alert is private, check the Private Alert box. By default, the current owner is displayed as the Alert Owner but you can specify another user by selecting the Search icon and choosing a different user. Only this person and the administrators who can view/edit private alerts will see this alert.
- Note: This does not affect alert notification settings. To manage privacy of in-system notifications for this alert, see Common Module Role Functions.
- For the Repeat Alert check box, do one of the following:
- Leave the box unchecked. When an alert is triggered, the system will check the BlacklistAn RL6 feature that tracks sent alert notifications and controls the re-distribution of notifications when an alert is triggered multiple times at scheduled intervals. When there is a new alert, the Alert processor checks the Blacklist to determine whether or not a notification should be sent to a recipient. If no entry of a prior notification is found, a new notification will be sent to the recipient. But if a notification was sent earlier, no duplicate notification will be sent unless the Repeat Alert option in the Alert properties is checked or when there is an update to a related patient file. The black-list can be thought of as a do not call list. For all modules except Infection, the Blacklist is a combination of alert, user and file ID. For Infection, the Blacklist is a combination of alert, user and matching criteria of the alert definition.. If the system finds notifications sent previously to a recipient, no new duplicate notification will be sent for the file. (The system will only send an alert notification when it finds no prior notification was sent.)
- Check the box to allow recipients to receive repeat notifications in notification messages each time a schedule triggers an alert.
- Note: This field is read-only for Watchdog and HL7Health Level-7 is an international set of open standards used to format data and content, allowing different health information systems to easily and effectively communicate with one another. alerts.
- Leave the box unchecked. When an alert is triggered, the system will check the Blacklist
- Indicate the Alert Priority with a one or two-digit number. This field is used at the discretion of your
- Click OK to save and close the alert.