Concept Information
Related Tasks
Purging RL6 Files
The RL6 Files![]() The electronic record created when a user submits an incident report, such as a fall or medication error, or when a patient provides feedback. Some organizations refer to files as events, reports, or cases. tab allows you to manage your database size by purging files from specific modules in your RL6 database. Before proceeding with this operation, verify all legal, regulatory or internal policy requirements that define how long your organization must retain file data.
The electronic record created when a user submits an incident report, such as a fall or medication error, or when a patient provides feedback. Some organizations refer to files as events, reports, or cases. tab allows you to manage your database size by purging files from specific modules in your RL6 database. Before proceeding with this operation, verify all legal, regulatory or internal policy requirements that define how long your organization must retain file data.
Note: Once completed, this operation can not be reversed. It is recommended that you create a backup of your database before beginning this procedure.
To purge files from the RL6 database:
-
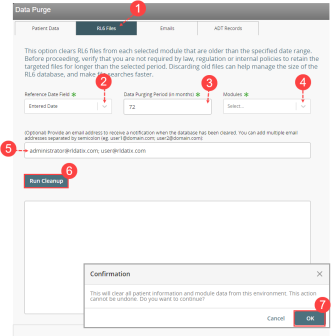
Open the Data Purge page and click on the RL6 Files tab.
-
From the Reference Date Field drop-down, choose one of the following options:
-
Entered Date - uses the data entry date from which data will be selected for the purge. Note: This is the default option
-
Last Modified - uses the last modified date from which data will be selected for the purge.
-
-
In the Data Purging Period (in months) field, leave the current setting as is or enter a number to determine how many months from the present date for which files is to be deleted. Note: The default setting is 72 months. For example, with the default settings, this means that all files with Entered Date older than 72 months from the present date will be deleted.
-
From the Modules drop-down, select the modules to be included in the data purge.
-
(Optional) In the email notification field, enter the email addresses will receive a notification when the database is cleared. Note: When you enter multiple addresses, separate each address with a semi-colon (;).
-
Click Run Cleanup.The status field displays the process of the cleanup process.
-
A confirmation message is displayed. Click OK to continue.
The system will begin to purge the data and the Status box displays the progress of the cleanup.