Concept Information
Related Tasks
Purging Patient Data
To provide better support for maintaining database sizes, users now have the ability to purge HL7![]() Health Level-7 is an international set of open standards used to format data and content, allowing different health information systems to easily and effectively communicate with one another. data based on a configurable time stamp in HL7 Listener.
Health Level-7 is an international set of open standards used to format data and content, allowing different health information systems to easily and effectively communicate with one another. data based on a configurable time stamp in HL7 Listener.
-
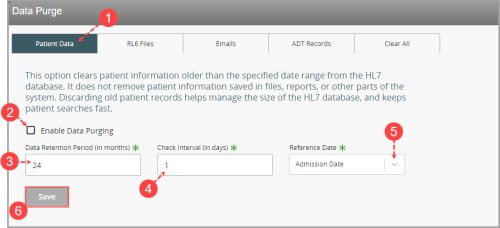
Open the Data Purge page and click on the Patient Data tab.
-
Check the Enable Data Purging box to enable the feature.
-
In the Data Purging Period (in months) field, enter the number of months from the current date from which files are purged. The default is 24. Therefore, files with admission dates older than 24 months from the current date would be purged. And files with admission dates falling within the 24 month period are retained in the HL7 database.
-
In the Data Purging Check Intervals (in days) field, enter the interval (i.e. number of days) to check when the service starts up and purge data based on the interval. The default is 1 (i.e. this means that the check begins at the start of service, then schedules the purge to occur exactly 1 day later and the next day after etc.).
-
In the Reference Date drop-down, choose one of the following options:
-
Admission Date - uses the admission date from which data will be selected for the purge. Note: This is the default option.
-
Event
A patient or employee related occurrence which is recorded in paper or electronic format. Once recorded, an event file is reviewed by a file manager who may involve other individuals (e.g. using tasks and follow-ups features) to help investigate and resolve the event. Date Time - uses the Event date/time from which data will be selected for the purge. -
Discharge Date - uses the Discharge date from which data will be selected for the system.
-
-
Click Save.
The data purge configuration settings are saved. When the purge is in progress, the Status box displays the status messages.