Managing Form Fields
Incident for RL6:Risk![]() See Event UDFS
See Event UDFSClaimUDFS for RL6:Claims,Feedback UDFS for RL6:Feedback
Prerequisites: You must have the Manage Fields and Tables role function enabled.
- Click the Logged in as menu and click Admin A number of fields grouped together by sections to allow users to enter and store data related to a patient or employee event. You can define multiple forms for a module. Forms fall into two categories: submission forms (i.e. for front line entry users) and management forms (i.e. for file manager users). Management forms contain the same data as submission forms with added sections for follow-up investigations and resolutions and outcomes. and Fields heading, click the Fields link (not shown).
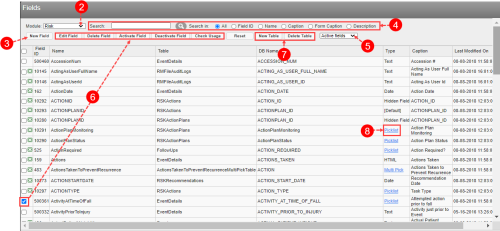
- Select a Module to view the associated fields.
- In the Fields page, click New Field to create new field.
- Type a value into the Search field and click the magnifying glass icon to locate a specific field. If necessary, specify whether you would like to search the field’s Field ID, Name, Caption, Form Caption or Description. Click Reset to remove the search filters.
- Select a filter: All fields, Active fields or Inactive fields.
- Select a check box next to a field to activate the following links:
- Edit Field – to view and edit the field details.
- Delete Field – to remove the field from the database. Click Yes to confirm the deletion.
- Note: Only user-defined fields that are not currently in use can be deleted. System defined fields and user defined fields that are being used (e.g. in constraint, expression, alert, report etc.) cannot be deleted.
- Activate Field - activates the selected field(s) to be made available in field pickers in the RL6 application.
- Deactivate Field - deactivates the selected field(s) so that they are hidden and cannot be selected in field pickers in the RL6 application.
- Check Usage – to see what forms, expressions and other system elements use the field (Checking Pick List, List Item and Field Usage)
- Add or delete a table - New Table option allows you to create a new user defined table and the Delete Table option allows you to delete a table for which you have created. See Creating a New User Defined Table.
- Add, delete, or edit items in a pick list, radio button, or multi-pick fields by clicking the link in the Type column.
- Note: Users are unable to modify the name (Value) of an existing pick list item from this