Adding or Editing Fields
Prerequisites: You must have the 'Manage Fields and Tables' and the 'Create Fields and Tables' role function enabled.
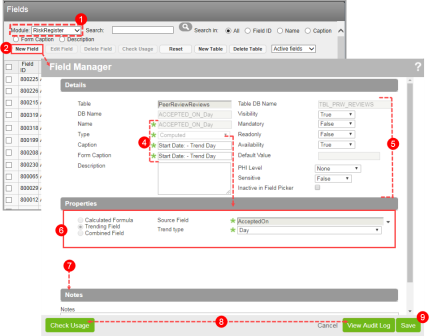
- Access the Fields page and select the Module.
- Click New Field. The Field Manager opens.
- Note: To modify an existing field, check the box next to the field and click Edit Field. A few attributes may be modified after the field’s creation (e.g., Caption and Description). You can delete fields which you have added. However, you can not delete system-defined fields (i.e. fields created by RL administrators).
- If creating a new field, you can click the ellipses (...) button next to the Table field to select the table to which the field will be added. Once you save the field, the Table field cannot be edited (not shown).
- Warning: When creating a new pick tree field, you must change the default Table selection to a table OTHER THAN a user-defined table (UDFS). Switching the Table field from the default UDFS to another pre-existing table is required for proper functioning of the pick tree field on the form.
- At a minimum, complete the required fields:
- Name – the name appears in the Fields list and is used to construct the DB Name. The name must begin with a letter but can contain numbers and letters. It cannot contain spaces or special characters.
- Type – the content in the Properties area changes based upon your selection.
- Caption – the default label for the field. This can be overridden at the form level.
- Form Caption – the label for the field as it would appear on forms.
- Note: This can be overridden by the Caption element property in Form Designer (Caption).
- If desired, modify or complete the other fields in the Details area.
- Complete the fields in the Properties area.
- Include any notes about the field in the Notes field.
- You can check the usage and activity of existing fields by clicking Check Usage and View Audit Log, respectively. See Checking Pick List, List Item and Field Usage and Understanding Audit Log Entries for more information.
- Note: When accessed through the Field Manager, the audit log will register but not display entries when a new multipick list or tree field is created.
- Click Save to create a new field.