Concept Information
Related Tasks
Reference Materials
Creating a New User Defined Table
Administrators can create tables to be added to the metabase within the RL6 database. Once added to the metabase, the fields you add to the new table can then be added to forms, then pop-up grids and used in reports.
Prerequisites: You must have the 'Manage Fields and Tables' and the Create Fields and Tables' role function enabled.
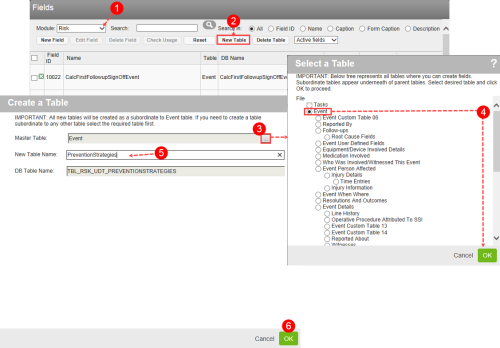
- Go to the Fields page and choose a module (e.g. Risk) from the Module drop-down list.
- Click New Table. The Create a Table
- For each module, a master table under which the new table will be created is selected by default. For example, the default master table for Risk is "Events" [TBL_INC_CASES]. You can use the default option or select a different master table by clicking the ellipsis (...) button.
- (If necessary) In the Select a Table
- Tip: When selecting a table, consider where the table will reside in the form. If, for example, the data should appear in the main form, use the default table. However, if it should appear in a specific grid (e.g. Follow-ups grid), choose that subordinate table.
- Enter a New Table Name. This name will be stored as the table caption.
- Note: The Database Table Name field is automatically populated accordingly: "TBL_[module]_UDT_[NewTableName]".
- Click OK.
The table is created. As well, new fields are created to store the table's Primary Key![]() A unique number that identifies a record in a database. RL6:Claims files can have the same claim number, for example, and the primary key is used to differentiate between the two files., Last Modified Date, Last Modified By and Foreign Key. These columns exist for all tables in the metabase but are hidden fields.
A unique number that identifies a record in a database. RL6:Claims files can have the same claim number, for example, and the primary key is used to differentiate between the two files., Last Modified Date, Last Modified By and Foreign Key. These columns exist for all tables in the metabase but are hidden fields.
Next steps after creating the table:
- Create fields for the table. See Adding or Editing Fields.
- Then, add the fields to the form. For example, add a new pop-up grid to a form using the fields in the new table to collect multiple records per file. See Navigating the Form Designer.