Concept Information
Integrated Data Feeds for Pick Lists
Related Tasks
Adding or Editing Pick List Details
Checking Pick List, List Item and Field Usage
Reference Materials
Configuring Pick Trees
Any multi-pick list that is grouped into categories is called a pick tree.
Prerequisites: The 'Pick Lists' role function must be enabled.
- Click the Logged in as link and click Admin A number of fields grouped together by sections to allow users to enter and store data related to a patient or employee event. You can define multiple forms for a module. Forms fall into two categories: submission forms (i.e. for front line entry users) and management forms (i.e. for file manager users). Management forms contain the same data as submission forms with added sections for follow-up investigations and resolutions and outcomes. and Fields heading, click Pick Trees (not shown).
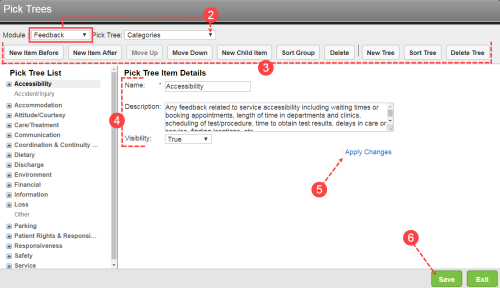
- Choose a Module, then the name of a Pick Tree within the module.
- To change the layout or composition of the selected pick tree, click on a category header or item in the Pick Tree List side panel. Use the following action buttons:
- New Item Before – inserts a new same-level item before the selected item
- New Item After – inserts a new same-level item after the selected item
- Move Up and Move Down – moves the selected item up or down in the list within the group
- New Child Item – creates a new item and a new sub-level under the selected item
- Sort Group – activated when a top-level heading item is selected; sorts the items in the group alphabetically
- Delete – deletes the selected item or entire group
- New Tree – starts the process of creating a new pick tree list
- Sort Tree – sorts the entire pick tree alphabetically, including all sub-levels
- Delete Tree – deletes the pick tree list and all associated items
- To edit a pick tree item's details, click on the item in the Pick Tree List side panel. You can change any of the following details:
- Name – enter a new name for the item
- Description – enter a description for the item.
- Visibility – select a visibility level to control whether an item will be visible (i.e., True), hidden (i.e., False), or conditionally visible according to the criteria in the Expression Editor (i.e. Calculated).
- Click Apply Changes to view your changes to the pick tree in the side panel.
- Click Save.