Concept Information
Integrated Data Feeds for Pick Lists
Related Tasks
Adding or Editing Pick List Details
Checking Pick List, List Item and Field Usage
Reference Materials
Configuring Pick Lists
Prerequisites: The 'Pick Lists' and 'Replace Pick Lists' role functions must be enabled.
- Click the Logged in as menu and click Admin A number of fields grouped together by sections to allow users to enter and store data related to a patient or employee event. You can define multiple forms for a module. Forms fall into two categories: submission forms (i.e. for front line entry users) and management forms (i.e. for file manager users). Management forms contain the same data as submission forms with added sections for follow-up investigations and resolutions and outcomes. and Fields heading, click the Pick List Manager (not shown).
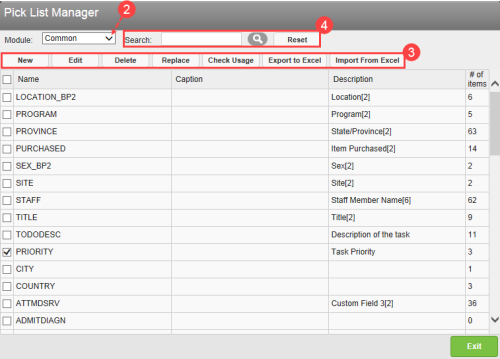
- Select a Module from the drop-down list. All pick lists for the selected module are displayed in the grid.
- Use the following action buttons:
- New – creates a new list.
- Edit – opens the pick list in the editor.
- Delete – removes the selected list from the database. A message displays if the list is used elsewhere in RL6; click Yes to confirm the deletion.
- Replace – changes values selected on multiple files in bulk.
- Check Usage – scans the RL6 database for occurrences where the pick list is used. This helps give you a better understanding of relationships shared by the various components of the system.
- Export to Excel – exports the selected pick lists into spreadsheets.
- Import from Excel – imports a pick list file from your computer.
- New – creates a new list.
- Search - the search fields allows you to locate a specific pick list. Enter the name of the pick list and click the Search icon. Click Reset to restore the default list.