Managing Fields for a Report in Report Designer
To manage fields for a report in Report Designer:
-
Open or create a new report in the Report Designer.
-
Click the Manage Fields
 button.
To add, modify, delete, or re-order fields in a report in the Report Designer, you must first add a field to the data source:
-
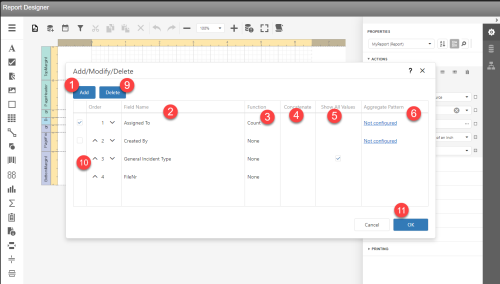
In the Add/Modify/Delete dialog, click Add.
Only modules for which you have access are displayed in the list.
-
In the Field Name column, select a field from the field list. The selected field is added as a new row in the list.
Note: Fields already present in the report data source are excluded from the field list.
-
In the Function column, select the function for the record. When the selected field is a number, you can select from the following options: None, Count, CountUnique, Maximum, Minimum, Average, or Summation. When the selected field is not a number, you can select from: None, Count, CountUnique, Maximum, or Minimum.
-
(For multi-pick fields only) In the Concatenate column, a checkbox is displayed. By default, the box is selected meaning that multi-pick selections will be displayed in a single row, with each selection separated by a comma. Unchecked, each multi-pick selection will be shown in a separate row.
Note: When the field is not a multi-pick, the checkbox is not displayed and no action is required for this column.
-
(For picklist or multi-pick fields only) The Show All Values column allows you to display values for all picklist or multi-pick options. Use this option if you want the report to show data for all possible options even if there are 0 records associated in the given report.
Note: If the field is not a picklist or multi-pick, this option is not available.
-
(For numeric fields only) In the Aggregate Pattern column, you can group numeric fields into ranges. See Grouping Numeric Fields into Ranges
-
To add another field, click the Add button and repeat the procedure.
-
Modify a field by selecting a column and changing the value.
-
To remove a field, select the record's checkbox and click Delete.
Note: If a field is enabled for use in a report, the checkbox is disabled and the option to delete is unavailable.
-
To change the order of the fields in the list, click on the up or down arrows in the Order column.
-
When you are finished adding, modifying, deleting, and re-ordering fields, click OK.
With the field added to the data source, you can add it to the report. Note: Deleted fields will be removed from the data source automatically.

Add the data source to the report
-
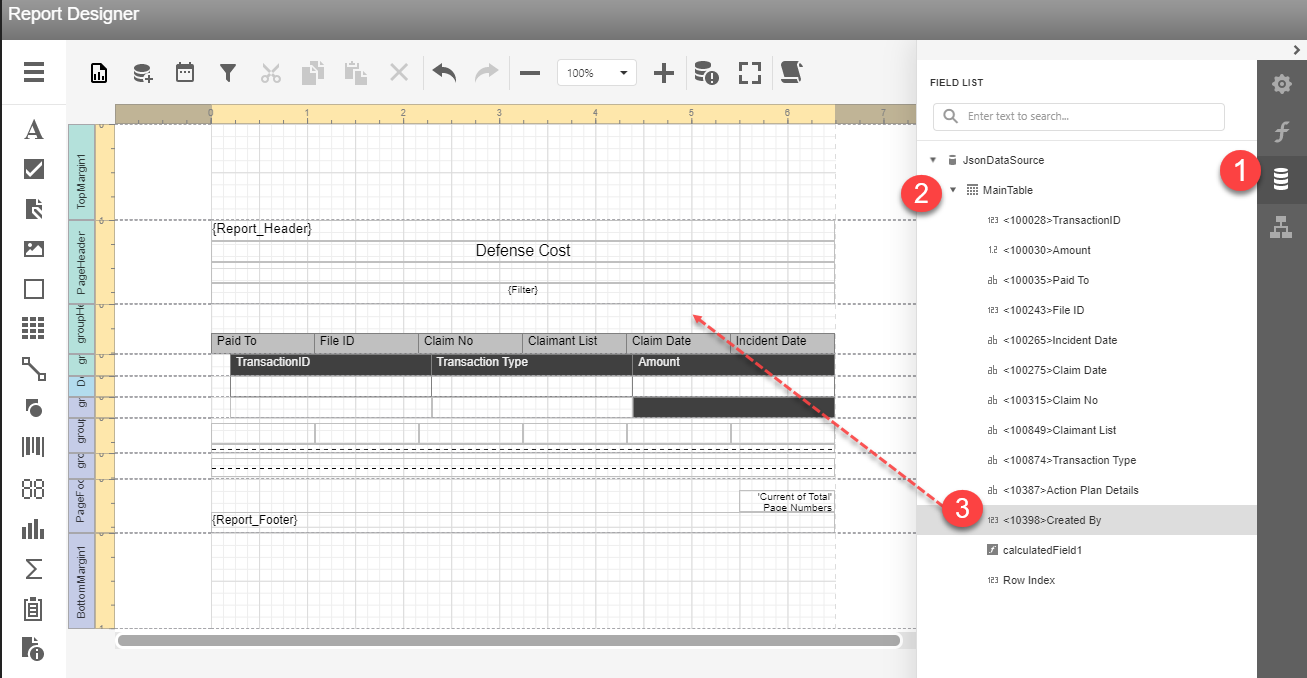
Open the Field List panel and click the Fields
 button.
 -
Expand the data source > MainTable category. The new fields appear in the list.
-
Drag and drop the field to the design surface.
Now, you can run the report to see the report with the new field added and save it.

